
Things You Need
A decent computer
computer, preferably a desktop one. If your computer is fairly recent, you should
have no problem. You could, however, experience issues on a laptop,
depending on how fast it is. The game I will be focusing on, DOTA2, is available
on Windows and Mac.
A YouTube account
Obviously, if you want to have your own YouTube channel, you need a YouTube
account. Preferably, it should be at least six months old. The reason behind this is
that Google (which owns YouTube) tends be scrutinize much more closely
accounts that are less than six months old. This could cause each of the videos
you upload to be manually reviewed by YouTube, making them ineligible for
monetization for days until a YouTube staffer finally takes a look at them.
An Adsense account
To monetize your videos on YouTube, you need two things:
• A YouTube account that is eligible for monetization
• An Adsense account to receive your payments
If you live in a Western country, your YouTube account should be automatically
eligible for monetization. To enable it, go to the Video Manager section in the
channel you want to enable monetization for and follow the instructions under
Channel Settings > Monetization.
If you live in a country where YouTube does not allow you to directly enable
monetization, do not despair for there is a nice little workaround which I will
explain in Appendix A of this e-book.
Quick note here: if your channel is not eligible for monetization because you
have received complaints or warnings about your content, use a different
YouTube account altogether.
If you already have an Adsense account, great. Simply follow the instructions in
your YouTube channel’s Video Manager to associate it with your YouTube
channel. If you don’t, head on to Appendix B where I will teach you how to get
your Adsense account approved in less than a week.
Recording software
To record the videos that you will upload to YouTube, you need a program that
will record your screen while you play the match replays inside the game.
In my opinion, the best program to do so is Camtasia Studio, which you can get
here:
www.techsmith.com/camtasia.html
This is a paid application, but you can download a 30-day trial version of it to try
it out.
Camtasia Studio is a pretty amazing program, as it allows you to record your
screen (this the program most WSO creators use when creating screencast
videos) and edit your videos. It is also easier to use than most other video editing
tools.
An Adwords account (optional)
If you want to maximize your earnings fast, you should need an Adwords
account. If, like me, you have previously been banned from Adwords, it is also
possible to promote your YouTube channel by using alternative advertising
networks such as Bing or Facebook. I personally used Facebook and it worked
fine.
This being said, this is entirely optional. As I will explain later, it is just a matter of
getting more channel subscribers quickly. If you do not want to pay to promote
your channel, you will get viewers. It will just take a little bit longer for you to do
so.


==========================================================
DOTA2
Before we move on to the method proper, I should tell you a little bit more
about the game I will use during this tutorial: DOTA2.
As I’ve said before, you do not have to be an expert or even have to play the
game to do this method, but it wouldn’t hurt to know a little bit about the game
if just for you to be able to write better video descriptions in YouTube. (You at
least have to sound like you know what you’re talking about, right?)
So, let’s ask our best buddy, Wikipedia, about DOTA2:
Each match of Dota 2 is independent and involves two teams,
both containing five players and each occupying a stronghold
at either end of the map. Located in each stronghold is a
building called the "Ancient"; to win, a team must destroy the
enemy's Ancient. Each player controls a "Hero" character and
focuses on leveling up, collecting gold, acquiring items and
fighting against the other team to achieve victory.
That’s a pretty good and concise description of the game right there.
It is also worth noting that DOTA2 is free to play. In other words, you do not have
to pay a dime to download and install the game.
I’m not going to bore you with details, but I am going to give you a link to a
pretty nice 4-minute video which will give you more details about the game:
==========================================================================
=======================================================================
The Method
The method I’ve used and which has proven to be so lucrative is deceptively
easy:
1. Create a DOTA2 YouTube channel
2. Record the highlights of a tournament game in DOTA2
3. Post the video on your YouTube channel and monetize it.
4. Repeat steps 2 and 3 daily or twice daily.
5. Promote the best video in your channel by using Adwords (optional)
If you implement this method correctly, within a couple of months, you should
have a channel with over 10,000 subscribers and 100 videos. Within a year, over
1,000 videos and probably between 50,000 to 100,000 subscribers.
Let’s be clear: the goal here is not to have the best DOTA2 channel on YouTube.
There are professional gamers out there who can (and do) create such
channels and you will never be able to compete with them quality-wise.
The goal is to produce videos quickly and upload 2 or 3 per day to your
channel. In other words, quantity over quality.
Remember: Your Adsense revenue will be exactly the same whether you have
one video that gets 10,000,000 views over its lifetime or 1,000 videos that each
get 10,000 views (a pretty low number by YouTube standards).
And, which one of those goals do you think is easier to reach? Unless you
happen to be a pop star, I would say number 2.
Note: Throughout this method, I will use DOTA2 as an example. It is of course
possible (and recommended) to use the same exact method for other games
popular in e-sports such as LoL, HoN or CS:GO.
============================================================================
============================================================================
=========================================================================================
Step-by-Step Guide
Step 1: Installing Steam and DOTA2 (One-time step)
Before you can start working on this method, you obviously need to download
and install the game.
To install DOTA2, you first need to download Steam. Steam is an online store for
video games. This application lets you buy games, install them and even keeps
them updated when new updates are released.
Go to http://store.steampowered.com/about/ and download the Steam
installer.
Once the program is installed on your computer, create an account by
following the instructions (it’s free, of course), and launch the program.
The main page in Steam is the Store page. Use the search engine on the Store
page to search for “DOTA2.”
On the “DOTA2” page, click on the “Download” button and follow the
instructions to start downloading the game.
Be patient, though. DOTA2’s game files are over 8GB in size, which may take a
while to download.
You can track your download by clicking on the download meter at the bottom
of the Steam window.
Once the download is complete, go to the Library tab in Steam and click on
“Play” next to “DOTA2.”
Check that the game launches properly. Then click on the Gear icon at the top-
left of the screen while you’re in DOTA2 to open the Settings panel. Open the
“Video” tab.
Next to “Display mode,” select “Borderless window” and click on “Apply.” This
will allow Camtasia to properly record your videos.
============================================================================
============================================================================

==============================================================================
You can now exit DOTA2 if you wish (or play a game if you feel like it ;) ).
Step 2: Creating Your YouTube Channel
Head on over to YouTube and create a new channel (Click on your name >
Switch account > All my choices > Create a new channel).
Select a suitable name for your new channel. Make sure to pick something that
feels exciting, something that people would really want to watch.
For example, no one would really be interested in subscribing to “Best DOTA2
Channel.” On the other hand, I’m sure a lot of gamers would subscribe to
“DOTA2 Team Fights” or “Crazy DOTA2 Plays.”
Go to Google Images and look for suitable pictures to use as your channel’s
cover photo and profile icon. Again, look for pictures that are related to the
game you chose and that are beautiful and exciting.
Step 3: Recording the Highlights of a Game
Launch Camtasia Studio Recorder, and then launch DOTA2.
At the top of the main DOTA2 interface, you will notice a “Watch” button. Click
on it.

amateur tournament games.

As you can see here, tournaments in DOTA2 are classified as either Premium,
Professional or Amateur.
For this method, we are going to focus only on Professional and Premium games.
Why? Because those games are the ones where the world-famous pro teams
play. Therefore they are the ones that have the largest potential audience and
the ones you can easily monetize.
Note: Some of the Premium tournaments require you to buy a ticket in order to
watch the games. Most tickets are under $10 and give you access to at least 80
games or so, which, to me, is a bargain considering those are 80 new potential
videos for your channel. Still, it’s entirely up to you whether you want to buy
tickets for those tournaments or not. If you want to restrict yourself to free
tournaments, you will still find plenty of good games to record.
Anyway, to view the games that have been played in a tournament, click on
the arrow next to it. You will see the following window.
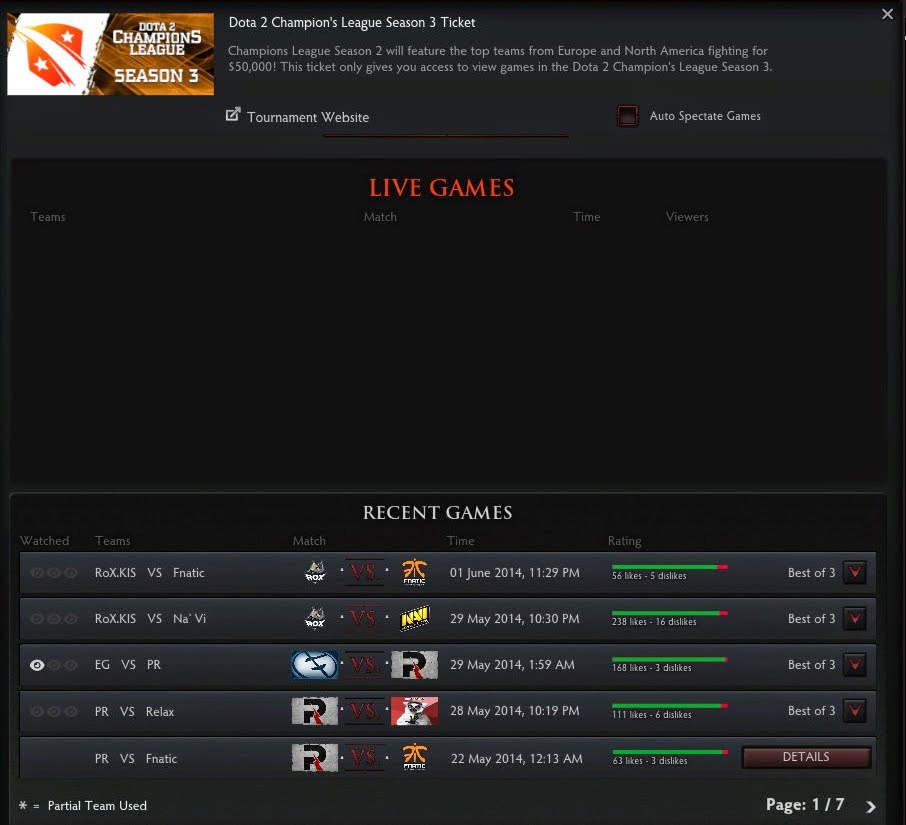
As you can see at the bottom of the page, there are seven pages of games
that have been played already. You can also see the names of the teams as
well as the date on which the game was played.
Click on “Details” next to the game you want to record. If it was a Best of 3 or a
Best of 5 match, use the arrow to open a drop-down menu and select which
game you want to record (Game1, Game2, etc…).
As an example here, I will select PR vs Fnatic.

Click on the “Download Replay” button to download the files related to that
game.
Once the download is complete (that should only take about a minute
or so), you will see the following buttons:
At this point, press the F9 key on your keyboard (or whichever key you assigned
to the “Recording” button in Camtasia) to start recording the screen.

Then press “Watch highlights.”
The “Watch highlights” function is DOTA2 is pretty amazing because it
automatically selects and plays back the most action-packed moment of a
game. You do not need to do anything, just sit back and enjoy!
Actually, you do need to do ONE thing, which is to click on the language of the
broadcaster you want to listen to during the game. The broadcaster is, in e-
sports, the equivalent of a sports commentator.
So, once the game starts, click on the American or British flag in this window:

Then sit back and enjoy the game (or not). The highlights reel should last a few
minutes at most. You will know it’s over when the scoreboard appears. Feel free
to then click the “Close” button, press the F10 key on your keyboard to stop
Camtasia from recording and quit DOTA2.
So, in short, because I know it’s a lot of information if you’re not familiar with the
process:
• Open the Watch pane, select a tournament and select a game.
• Download the replay.
• Press F9 to instruct Camtasia to start recording the screen.
• Click on the Watch Highlights button and select the broadcaster when
the game has loaded.
• Wait for the game to end.
• Close everything and stop the recording.
Now, you may be wondering: “OK, but there are thousands of games available
to download in DOTA2, how do I know which ones to download?”
Well, as long as you stick with Professional and Premium tournaments, it’s easy:
download whichever games you want. Those tournaments attract teams that
already have a huge fanbase. Whichever game you download (as long as you
follow the rest of my instructions) should automatically get many views on
YouTube.
Step 4: Editing and Exporting the Video in Camtasia
Once you have stopped the recording in Camtasia, a Preview window should
pop up.
Click on the “Save and Edit” button to export your recording to the main
Camtasia Studio application. Save the Camtasia project file on your hard drive.
Once Camtasia launches, a window should pop up, asking you to edit the
dimensions.
Select “1280x720” and click on “OK.”

Your video is almost ready to export. But, since I’m a perfectionist, I like to get rid
of the part at the beginning where the game window and the loading screen
show up. Since you had to press the F9 recording key before launching the
game, there are a few seconds of extra garbage footage there at the
beginning.
To get rid of it, use the green and red arrows next to Camtasia’s playhead at the
bottom of the screen. Bring the playhead to the beginning of the timeline and
drag the red arrow next to it to the spot you want to clip to begin at (use the
preview screen to help you). Once you have selected all of the footage you
don’t want in your video, click on the Scissors icon to delete it.

All you have to do now is export the video.
Open the “File” menu and select “Produce and Share.”
DO NOT select “Share to YouTube.” If you select that option, you will not be able
to save it to the appropriate channel.
Instead, select “MP4 only (up to 720p).” Name your video and save it to your
hard drive.
Step 5: Upload the Video to YouTube
Log in to your YouTube channel and start uploading the MP4 file you just
created.
Give your video a good, exciting name. No one wants to watch “PR vs Fnatic
May 28th.” On the other hand, a lot of people would probably be interested in
“Fnatic destroys PR in this game!” or “Crazy PR vs Fnatic game!” Write a good,
generic description (it’s not that important). In the Tags field, make sure to tag
both of the teams’ names as well as “DOTA” and “DOTA2.”
Finally, do not forget to enable monetization on this video in the “Monetization”
tab.
Step 6: Repeat, Repeat, Repeat…
Repeat steps 3, 4 and 5 at least twice daily. However, make sure not to upload
too many videos at a time (say, 10 or so) because that could cause YouTube to
become somewhat suspicious and place your account under review.
In my own personal experience, I have found that uploading 3 to 4 videos per
day seems to be just right. Just enough to get the traffic you want and not too
much in terms of raising suspicions and looking like a spammer.
Make sure to spread your uploads throughout the day.
What is important to remember, however, is that growing traffic takes time and
takes dedication. Do not quit after just one week because your traffic numbers
are disappointing. My Adsense revenues only started skyrocketing after the third
month! Stay on course and I promise you, traffic will come.
Step 7: Promoting Your Channel (Optional)
This step is entirely optional, but if done right, it can really do wonders for this
method.
As I mentioned in the previous step, it takes time to get the amount of daily
traffic you need to generate substantial Adsense revenue. Or, to be more
accurate, to get the amount of subscribers to your channel. I say “subscribers”
here because they truly are the bread and butter of YouTube channel owners.
They are your number 1 source of traffic because, not only do they
automatically get notified when you upload a new video, they also tend to be
more active. In other words, they comment more and they also share more.
Which means additional views.
To get to 10,000 subscribers quickly (a number which is significant because, at
this point, you should start making real money), you can promote your video via
Adwords for YouTube. To do so, go to the Video Manager section of YouTube
and click on the arrow next to “Edit” to the right of the video you want to
promote.
This will take you to a settings screen where you will be able to set up various
parameters, such as how much you want to spend on your ad. Then you will be
redirected to your Adwords account or you will be able to create one.
Should you promote all of your videos? NO! Just pick the video you think is the
most exciting one and promote the hell out of it. You want to get that video as
many views as possible, according to your budget. Focus your advertising
money on one video, not even two or three.
Have you been banned from Adwords? First of all, don’t feel bad, I have too.
Google seems to really dislike Internet marketers when it comes to their
advertising platform and many of us have been banned as a result. Of course,
when your Adwords account is banned, you have absolutely zero chance of
getting it back and you also are prohibited from opening a new one using a
different email address. Fortunately, you can still promote your video by using
other advertising platforms such as Bing or Facebook. Personally, I used
Facebook to promote mine and it was a rather pleasant (if not exactly cheap)
experience.
Can I still make money even if I do not promote my channel? Of course! It will
take more time, though.
Excellent question (That’s what people say when they’re asked a tough
question, right?). I would say: it depends. It depends on how dedicated you are,
on the game you choose to focus on and on your ability to choose good titles
for your videos.
Personally, in my first month doing this method, I made $84. In the second
month, $193. By the end of the third month, I had made over $1200 in Adsense
revenue. Now, ten months later, I routinely make over $9000 per month thanks to
the videos I uploaded to YouTube. Can you make that much money? If you do
it right, I’m absolutely sure you can.
No. Because this kind of videos help promote their games, the game developers
view them as an asset rather than as a liability. Therefore, none of the game
developers that are involved in e-sports have ever filed any DMCA or copyright
infringement complaint.
Twitch.tv streams many DOTA2/LoL/HoN games. Can I download
videos from there and upload them to my channel?
No! Games that are streamed on Twitch have a special overlay which is added
by the channel that is producing the stream. Copying that video (and therefore
that overlay) would be considered as copyright infringement.
What can I do if I do not have an Adsense account or if
monetization is not available in my country’s YouTube settings?
Well, you’re in luck because I have just the information you need in Appendix A
and Appendix B of this e-book!
If you live in a Western country, in Japan or in Australia (along with a few other
countries), you’re in luck because video monetization is available on your
regional YouTube website. You just need to enable it via your Video Manager.
However, if you happen to live in a country where monetization is not available,
you will see a message telling you that monetization is not available in your
country if you try to do so.
Fortunately, there is a workaround.
Go to your channel’s homepage and click on the “Edit” pencil icon that is at
the bottom-right of your channel’s cover photo. From the menu that pops up,
select “Channel settings.”
There, change your channel’s country to a Western country (France, Germany,
United Kingdom, etc…) and save your new settings.
It is important to note that this setting only affects your channel. Your Google
account, as well as your Adsense account’s country will not be modified.
You should now, however, be able to enable monetization in your Video
Manager.
Appendix B: You Don’t Have an Adsense Account
Getting an Adsense account approved can be tough. It used to be really easy
until, a few years ago, Google realized that spammers had started abusing the
system. So, now, you need to go through a rigorous application process just to
get your account approved.
Fortunately, you can do it in just one week.
One quick note, though: Unless you happen to already have a YouTube
channel with many high-quality, original videos, do not try to apply to Adsense
by using your YouTube channel.
If you already have a website with plenty of original content, you’re in luck. Go
to the Adsense homepage, submit your application and wait about an hour.
After an hour, go back to the homepage, create an ad code, place it
anywhere on your website and wait about three days for the Adsense bot to
crawl your website. If the bot thinks your website is suitable for Adsense, you will
get an email telling you that your account is officially approved.
If you don’t have a website yet, here is a quick, simple and tested method that
works:
1. Sign up for a webhosting account at Hostgator. In my opinion, they’re the
best webhosting company out there (and they’re pretty cheap).
2. Order a domain name.
3. Log in to cPanel and use the QuickInstall feature to install WordPress.
4. Create 15 posts on your new blog with a minimum word count of 500.
5. Apply to Adsense with your new blog.
As a quick tip, do not create a technology or cooking-related blog, as those
sites rarely get approved by Adsense. Personally, I have found that travel-
related blogs are the easiest one to get approved with.
By the way, the 500-word blog posts do not need to be mind-blowingly good. As
long as they’re on-topic and written in decent English, you should be fine.
If you don’t like writing, you could even order those blog posts on Fiverr. Just
make sure to pick sellers who sell quality articles, not spun content.
Good luck!
FAQ
How much money can I make?
Excellent question (That’s what people say when they’re asked a tough
question, right?). I would say: it depends. It depends on how dedicated you are,
on the game you choose to focus on and on your ability to choose good titles
for your videos.
Personally, in my first month doing this method, I made $84. In the second
month, $193. By the end of the third month, I had made over $1200 in Adsense
revenue. Now, ten months later, I routinely make over $9000 per month thanks to
the videos I uploaded to YouTube. Can you make that much money? If you do
it right, I’m absolutely sure you can.
Can YouTube ban my account?
No. Because this kind of videos help promote their games, the game developers
view them as an asset rather than as a liability. Therefore, none of the game
developers that are involved in e-sports have ever filed any DMCA or copyright
infringement complaint.
Twitch.tv streams many DOTA2/LoL/HoN games. Can I download
videos from there and upload them to my channel?
No! Games that are streamed on Twitch have a special overlay which is added
by the channel that is producing the stream. Copying that video (and therefore
that overlay) would be considered as copyright infringement.
What can I do if I do not have an Adsense account or if
monetization is not available in my country’s YouTube settings?
Well, you’re in luck because I have just the information you need in Appendix A
and Appendix B of this e-book!
Appendix A: YouTube Monetization Issues
If you live in a Western country, in Japan or in Australia (along with a few other
countries), you’re in luck because video monetization is available on your
regional YouTube website. You just need to enable it via your Video Manager.
However, if you happen to live in a country where monetization is not available,
you will see a message telling you that monetization is not available in your
country if you try to do so.
Fortunately, there is a workaround.
Go to your channel’s homepage and click on the “Edit” pencil icon that is at
the bottom-right of your channel’s cover photo. From the menu that pops up,
select “Channel settings.”
There, change your channel’s country to a Western country (France, Germany,
United Kingdom, etc…) and save your new settings.
It is important to note that this setting only affects your channel. Your Google
account, as well as your Adsense account’s country will not be modified.
You should now, however, be able to enable monetization in your Video
Manager.
Appendix B: You Don’t Have an Adsense Account
Getting an Adsense account approved can be tough. It used to be really easy
until, a few years ago, Google realized that spammers had started abusing the
system. So, now, you need to go through a rigorous application process just to
get your account approved.
Fortunately, you can do it in just one week.
One quick note, though: Unless you happen to already have a YouTube
channel with many high-quality, original videos, do not try to apply to Adsense
by using your YouTube channel.
If you already have a website with plenty of original content, you’re in luck. Go
to the Adsense homepage, submit your application and wait about an hour.
After an hour, go back to the homepage, create an ad code, place it
anywhere on your website and wait about three days for the Adsense bot to
crawl your website. If the bot thinks your website is suitable for Adsense, you will
get an email telling you that your account is officially approved.
If you don’t have a website yet, here is a quick, simple and tested method that
works:
1. Sign up for a webhosting account at Hostgator. In my opinion, they’re the
best webhosting company out there (and they’re pretty cheap).
2. Order a domain name.
3. Log in to cPanel and use the QuickInstall feature to install WordPress.
4. Create 15 posts on your new blog with a minimum word count of 500.
5. Apply to Adsense with your new blog.
As a quick tip, do not create a technology or cooking-related blog, as those
sites rarely get approved by Adsense. Personally, I have found that travel-
related blogs are the easiest one to get approved with.
By the way, the 500-word blog posts do not need to be mind-blowingly good. As
long as they’re on-topic and written in decent English, you should be fine.
If you don’t like writing, you could even order those blog posts on Fiverr. Just
make sure to pick sellers who sell quality articles, not spun content.
Good luck!
No comments:
Post a Comment